Tuesday 22 February 2011

Slicing and Icing

DSC00354

Even though she never actually said it, Marie Antoinette's most well known saying is without a doubt “Let them eat cake”, so what else could we make into a hat other than a cupcake.

DSC00355

We used plastazote, Denise carved the top and I sorted out the case and the plate. We started off with a pattern for a miniature top hat and built it out from there.

DSCN2274

DSCN2287

After a couple of coats of latex its starting to take shape. It needs a few more coats, some shimmery paint and some airbrushing, but it should look pretty cute.

3rd times a charm…

DSCN2282

I’ve had an absolute mare with the footman jacket. I’ve ben working on it for the past two weeks, drawing the pattern, making toiles, failing, repeating. I did this loads and no matter how much I measured it kept coming out too small. Maybe its lack of sleep or I’m just the ultimate scatter brain, but it took about a week for me to work out what was going wrong. I was using Hanna’s (my female model) measurements, not Lee’s (my male model, above), not sure how I managed to make such an obvious mistake for so long. Anyway, its fixed now, and so I finally have a toile that fits well enough I can bare to show it to the internet world.

DSCN2283

It needed a bit of adjustment, but mostly it fitted okay. Though Lee did complain it was very tight under the arms. I’m not sure how much bigger to make them, I don’t want him to be uncomfortable, but historically the arm holes were a lot tighter than we wear them.

DSCN2285

In this image the left hand side has been taken in and the right hand side hasn’t. It definitely hangs better.

DSCN2299

This is an option for the buttons, its either these or fabric covered…I still have to decide.

Monday 14 February 2011

Starting the Footman

I started work on the footman’s jacket today, I was going to finish the ladies outfit in its entirety first, but I still haven’t settled on a fabric for it, so i thought I would make a start on this. It’s quite daunting, I’ve never worked on male clothing before (other than tunics). I found a full size version of the pattern above, but my model is a little on the small side, and the pattern was for a person over 6 foot. So I thought I would do better to work straight from the book. I had to completely ignore the scaling it gave, it would again have been way too big.

The process involved lots of grid drawing and took a couple of hours. I have decided a pattern master is an absolutely amazing piece of kit that I definitely need to own.

I very carefully made sure all the different bits matched the measurements, checked, and rechecked, then cut and stitched. Took time over tracing it out and ironing the side pleats.

DSCN2259

After all that (well, an hour or so) I slipped it on…

How on earth did I not spot it before? The back was about 10cm too narrow! I knew I was having a particularly scatter-brained day, but I remember looking a the back pattern piece and thinking it looked narrow. How come I didn’t measure it? I astound myself sometimes, never mind though, this is what toiles are for.

Saturday 12 February 2011

Regency Gown Toile

I used a combination of patterns and alterations to make this. And seen as I haven’t made a sash yet its tied with a head scarf. Its calico on the top half and an unidentifiable black substance for the skirt.

Obviously it needs a few inches taken off the bottom, but other than that its a pretty decent fit. It is being worn over the corset here, and it covers it all up. I’m trying to decide whether to drop the neckline slightly?

Wednesday 9 February 2011

Let them eat cake…kind of

DSCN2225

Denise recently wrote an article on being inspired by history to create a dress, but not actually making it historically accurate. So to go along with it we are making a dress inspired by Marie Antoinette.

DSCN2229

Its quite a quick little project, and starts out with netting. Lots and lots of layers of netting.

DSCN2228

The sewing machine kind of got buried in it all.

DSCN2233

Denise found two silk wedding dresses for £5 each in a jumble sale, and we are up-cycling them in this costume. Here is the skirt from one drawn into a new waistband as part of the underskirt.

DSCN2234

The top of the skirt involves a pink and purple silk swag, we are just playing around draping and pinning until something looks right. I really like it pinned up with the flower.

Sword Making Part 2

DSCN2188

Trace round the 9mm rectangle onto 6mm, and glue onto one side.

DSCN2190

Draw out the shape of the sword (a template and ruler help), then cut out (vertical cut, don’t angle yet).

DSCN2196

Stick another sheet of 6mm onto the other side of the 9mm.

DSCN2200

Using the already cut out area as a template, cut round the newly stuck on plastazote.

DSCN2202

Using a ruler and a craft knife carefully shape the plastazote at an angle to look like a blade.

DSCN2203

Trim the sword at the end so there is 4.5inches of pole poking out the end. Cut out a 4.5” x 4” piece of soft lead. This is what makes the sword a sufficient weight.

DSCN2204

Glue and wrap the lead round the pole at the end of the sword. A hammer helps to get the last bit right.

DSCN2206

Glue some 6mm round over the top of the lead, leaving the leather covered bit of pole poking out the end.

This is the point to design what kind of handle and detail to do. Which is what I’m off to do.

Sword Making Part 1

167819_10150123172563615_646183614_7679282_1044242_n

Martin is teaching me how to make weapons (like the ones above), not the dangerous metal kind, the slightly squidgy plastazote kind. Obviously I have used plastazote before to make the armour for my Valkyrie costume, but this is different. He makes them for live role-play events, so they have to be strong enough to withstand the fights, but soft enough not to actually hurt anyone.

DSCN2178

Start with a pole a few inches shorter than you want the sword. I’m not sure what the poles made of, but they are used mainly in ship building. File the rough ends slightly, and glue (contact adhesive throughout) a strip of leather over the top.

DSCN2177

Make a blank out of 9mm plastazote a few inches wider and longer than you want the sword, cut a slit down the middle, wide enough for the pole at one end.

DSCN2184

Glue the pole into the slot and then glue a small patch of leather over the ends on both sides (below).

DSCN2186

Tuesday 8 February 2011

Wollaton Corset Toile

So four hours, one vanilla yogurt, and several pin-pricks later, here is the first fitting of the toile. I’m pretty pleased with it as a first go considering all the alterations I made. I don’t have the right busk yet, at the moment all I have in there are two together which are too short and too thin, so not the best guide.

The only major alteration was that the straps needed shortening, I’d predicted this because it was the only area of the pattern I didn’t alter. From the research I have done, the corsets were almost entirely single spiral laced, I’ve never done that before, but it was a pleasure to only have to do half the number of eyelets.

It is bagging out around the waist, I’m not sure quite how to solve this. The real thing will be made of stronger fabric than calico, so maybe that will help. But I might try shaping the waist a bit more.

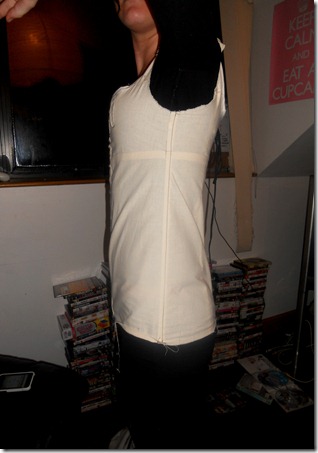
It did not feel like making a corset at all to do this, what with the sleeves and the lack of bones, only four in the entire thing.

I’m hoping the wrinkling here at the front will be solved with the right busk, also I need to remember to do fittings with a braless model, I’m sure there was a sneaky bit of padding going on here.

Making a physical start

DSCN2221

For my Wollaton Hall project I am starting with the ladies outfit, I have much more experience with female clothing than male, so I thought I would get this out of the way before tackling the footman costume.

I’m working from the base up, so corset is the first port of call. I can’t find the book I made this sketch from, but this is what I’m aiming for. My model is naturally slim, so she doesn’t need much in the way of support.

I borrowed this pattern (the short corset in the middle oval) as a starting point. I had to change it quite a lot, my corset is to open at the back not the front, come down to hip level not under-bust, and include a front busk. Also this pattern does not go smaller than a UK size 14, and my model is an 8.

Here is my version part way through, since this I split piece 5 into two with most of the angling for the hip going between the two new pieces, the angle on the far right in this version looked far too harsh.

Monday 7 February 2011

Footman Research

1806JaneAustenWorldDateDebatableBookOfDaysNineteenTeen

I’ve been researching footmen for my project, there is surprisingly little that I can find. The one relevant book in the library seems to have disappeared without a trace. So I have looked into films about the times as well. The footman uniforms were always fairly old fashioned, and there does not seem to be that much variation past colour, so I’m sure making a plausible design will not be too difficult.

footmanfootmenJaneAustenWorldPandP2005JaneAustenWorldSenseAndSensibilitySenseAndSensibilitya

Houses tended to have their own colours so i have been trying to find out the colour Wollaton house used, no luck so far though.

SenseAndSensibilityb