Monday, 2 January 2012

The Creation of 6 Giants, Part 2

DSCN3917

Obviously we couldn’t just leave the giants as bright blue body suits, so we covered the bodies in large vests of flesh tone lyrca. I can’t say it is one of my favourite fabrics to work with, but however awkward it makes the sewing, we definitely needed the stretch to cover the bodies properly.

DSCN3918

And with a little pinning and tucking, it is vastly improved. Everything was covered in labels right from the beginning, with 6 giants that were similar but not identical, it was important we could easily see what went with what.

DSCN3923

Then we added arms (sewing the arms in was my main job for about a week), which took ages because I had to do it after the lycra was on the foam body, which made it pretty tricky to get under the sewing machine.

DSCN4051

These are the prototypes for the arms and head, made of plastazote.

DSCN4095

After all the sewing we added loin cloths and they were all airbrushed. I am always surprised by the amazing difference that airbrushing makes, everything suddenly becomes more 3D than it was before.

DSCN4097

The Creation of 6 Giants, Part 1

DSCN3863   DSCN3868
In December I worked as an assistant at Promotional Props and Costumes. We worked on the job of creating 6 giant costumes for a production of the BFG at Derby Theatre.
To start with we made a foam body shell, then we padded it out on the shoulders, moobs and bum with more layers. The pictures below shows shoulder blades before and after carving with a scalpel.
DSCN3900DSCN3895   DSCN3878
Of course when your surrounded by blue foam body suits, the obvious activity is to wear them with silly wigs.
DSCN3904

Connected to the World Again

Front

Well it took 3 months, but my internet connection is finally back up. I can’t believe how long it took to get everything sorted, far longer than it should have anyway.

But back to the sewing, I made these for a ladies husband a few months ago for costume ball. I took the pattern from his Morris-Dancing breeches, but these had to be in white satin. I lined them in cotton though, the satin was a bit see through.

AdjustableWaist

The originals I took the pattern from had an adjustable waistband, so I added that in. It was less effort than expected, and works really well. I might start using it more.

LegCuffs

Breeches involve a lot more buttons than the average pair of trousers, I got to make full use of the button hole function on my machine. There is something I find daunting about button holes, the number of items I’ve made for myself which are perfectly finished apart from the safety pin holding them together. But they really aren’t that hard at all when I get round to them.

Tuesday, 11 October 2011

The Wanderer Returns

It’s fair to say, I’ve been an absolutely awful blogger of late. Everything happened at once, leaving uni, moving house, two new jobs, off on holiday, and now another new job for the next few weeks. It’s been all go. But I’ve finally sat down with a sprinkling or energy which for once is simultaneous with a (mostly) working internet. There is so much to catch up on. We finished the dagged hoods (previous post) and moved on the the main part of the outfits; the gambesons. A sort of historical puffer jacket worn under armour.

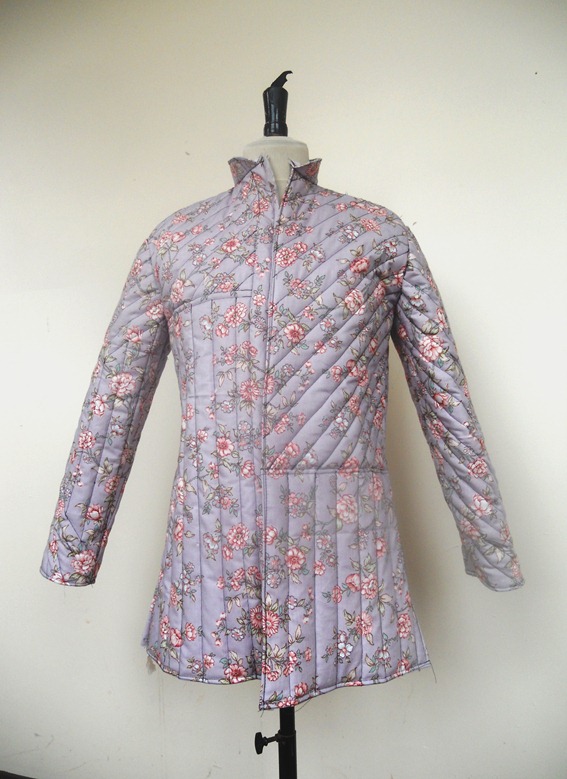
Just for a bit of fun, we made the mock-up (above) out of this completely inappropriate floral fabric, very many we thought. The sides don’t match because we tried different patterns of quilting. I prefer the side with less diagonal in it personally.

DSCN3264

Aside from the quilting, the actual pattern was very simple. Just a standard straight jacket. But for each pattern piece, there was a long process to go through to get it ready. It was made of four layers, a beautifully soft brushed cotton lay next to the skin, a wadding, and then two layers of linen. The wadding was an authentic cotton, it was so much nicer to use than the normal man-made stuff. As the gambesons were going to be broken down, we used two upper fabrics so that we could really work into the top one, and where holes were formed you just saw a slightly differently coloured linen; rather than straight to the wadding (below).

DSCN3210

When all the layers were so completely pinned we almost faced the catastrophe of empty pin pots, it was time to quilt. First with a standard straight stitch to hold everything in place, and then with a decorative one over the top. The second layer of stitching is what can be seen above in grey, large stitches which the machine goes back over 3 times. It took a long time going backwards and forwards like that, but it was definitely worth it, the quilting was much more visible (see difference between the two sleeve panels below). We also added strips of leather between every other row of stitching, for an extra dimension.

DSCN3262

After all the panels were ready it was assembled together. So that the panels flowed together nicely, we waited until this point to add the leather pieces which would cross seam lines, which especially across the back gave it better continuity. I hand stitched cotton twill tape over the top of every single seam on the inside, grading down and enclosing all the seam allowance.  It took hours, but was completely worth it, it really finished off the inside. Unfortunately I completely forgot to take a picture.

After I had done that, Denise bound the edges in leather, and our work was complete. 

DSCN3292DSCN3293DSCN3295

Thursday, 7 July 2011

Delving into the medieval.

I’ve had quite a time of it lately, after 3 years of student life, I finished uni a few weeks ago, and its time to greet the real world. I’m pretty much sorted now, found a house to live in, and job that will pay the bills – making theatre drapes for Presentation Design Services.

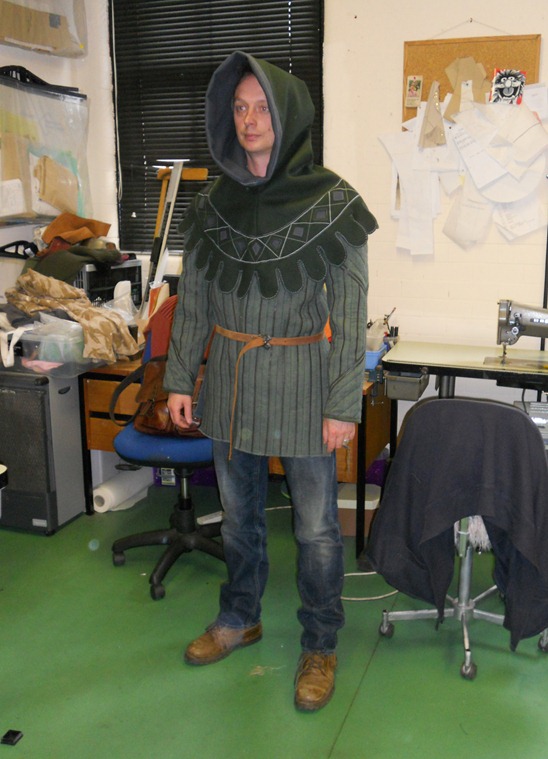
As well as that I have been keeping busy at The Custom Costume Company. Amongst other things at the moment, we are making 3 medieval inspired hoods. The wool is beautiful, the fibres feel felted, you can cut it and it does not fray a bit – wonderful stuff.

I had fun designing all the patterns, I’ve not done much in the way of machine embroidery and applique before. And they did not take any where near as long to embroider as I expected.

DSCN3138DSCN3129DSCN3139

The characters wearing the hoods are meant to be from the same regiment (if that is the right word) so patterns had to be recognisably similar, but not identical.

They are at a halfway stage right now.

DSCN3197DSCN3148DSCN3193

I think the green one is my favourite.